Honda NT650 "Deauville" - Adjust Steering Bearings
This page shows you how to adjust the steering (headstock) bearings on
your Deauville
motorcycle.
Skill
: 2. Tools : 1. Personally
dirty : 1. Work mess : 1. Space : 1. Time
: expert 30 minutes, average 45 minutes, "first-time" an hour.
Skill
levels explained. Return to the Deauville
Web Resource
All
nut and bolt sizes are given for the spanner size required to fit them.
Tools
: 30mm socket, extension bar and ratchet handle; Allen key set; long screwdriver;
torque wrench;
C-spanner.
This
page refers to a UK specification NT650V4 Deauville and I can't speak for what differences
there might be on other variants. I welcome amplification of any differences
from fellow owners - by all means contact me with a view to providing comparable
photos, which I'll credit accordingly.
All
the tools, hands, and bike in the pictures are the author's. I am very receptive
to comments and suggestions, but you use these pages entirely at your own risk.
I recommend wearing surgical gloves when working with oils and other fluids,
or just to help keep your hands clean.
James
says (June 5th 20210 "I just wanted to pass on something I found out
when doing a steering bearing adjustment. The C spanner required is the same
size as the C spanner for a bicycle bottom bracket, apply one of those on the
adjust nut and that means that it's easier to tighten the locknut without messing
up your adjustment."
Symptoms
of steering problems
Many
steering and handling problems are caused by worn or incorrectly inflated tyres,
especially the front tyre. In particular, "white lining" where the
bike wriggles when crossing painted lines on the road surface is often an indication
of your front tyre requiring replacement. So if you have steering problems,
first check tyre tread depth and inflation. Here are the correct tyre pressures
and sizes, all with cold tyres:-
FRONT 36 psi. Size 120/70 ZR 17 58W; REAR
42 psi. Size 150/70 ZR 17 69W. Same for rider or rider + passenger.
Also,
the way you load your bike can cause instability. Heavy weights such as tents
and backpacks should go low down on the pillion seat, not on your passenger's
back or on the top box lid. Avoid carrying anything heavy, such as a tool box,
in the top box or on the rear rack.
If
you take your hands off the handlebars for a few seconds, especially when slowing
down at the approach to a stop, do the handlebars start to rock or oscillate,
a movement which then gets worse until you resume your hold? This is indicative
of the steering bearings being too loose.
If
you bike "rolls" like a drunken sailor under similar conditions as
described above, the steering bearings are too tight.
Severely
maladjusted bearings can cause serious or fatal handling problems such as a
"tank slapper" which is when, at high speeds, the handlebars oscillate
so violently that they go full lock from left to right with great rapidity.
This usually results in a crash.
IF
YOU GET A TANK SLAPPER for any reason, the natural response is to throttle off.
DON'T DO THIS it makes things worse. Lie flat on the tank to get as much weight
as low down as possible. Then ease off the throttle. If you survive, investigate
the problem as a matter of urgency!
To
help diagnose slack bearings, put the Deauville
on its centre stand and have a friend push down on the rear so that the front
wheel is off the ground. Standing astride the front forks, grip the bottom of
the fork legs and push/pull firmly fore and aft. There should be nothing more
than a slight 'bendy' feel and nothing resembling a clonk, or any definite movement.
The
steering movement left and right should also be quite free and with no notchiness;
full left and right movement should occur with a light touch on the controls.
Both
these tests are MoT requirements and can fail the bike.
Adjusting
the steering bearings
As
this procedure involves removing the handlebars, it is vital that the front
brake master cylinder is kept at the normal horizontal angle, firstly to avoid
possible spillage of brake fluid onto paintwork but more importantly to prevent
air from entering the brake hoses.
In the pictures below the fuel tank
has been removed to facilitate other work, but you don't need to remove the
fuel tank to adjust the steering bearings. If you leave the tank in place, drape
an old towel over it to protect the paintwork from possible damage. If you want
to remove the tank, this
is how you do it.
|
To
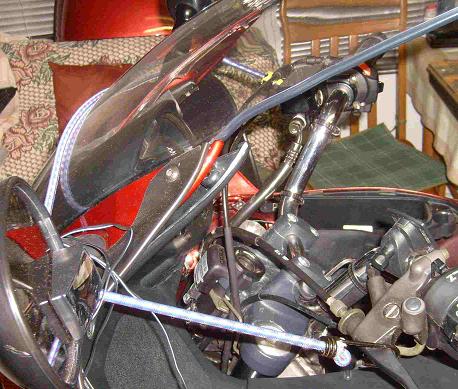
help keep the handlebars in as normal a position as possible, use an elastic
luggage strap to hold them more or less in place. With one end hooked
over the clutch lever, the strap passed over the windscreen (maybe one
turn around the mirror stalk) and the other end hooked over the brake
lever, your handlebars should stay horizontal even when you unbolt them.
|
|
|
|
The
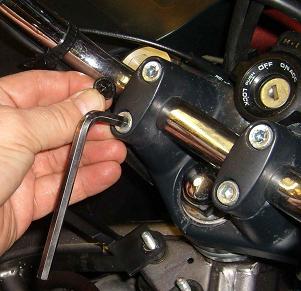
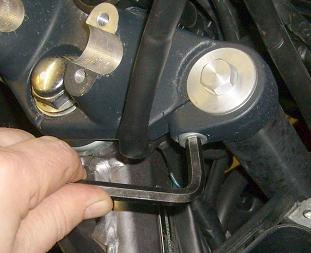
handlebars are held in place on the top section of the steering yoke by
two metal arch clamps, each secured by two Allen bolts (aka capscrews)
each covered by a small black plastic tab, which often gets lost. Prise
off the black tabs and use your Allen key to unbolt the four capscrews.
They can be tight, so a tap with a hammer on the Allen key might be required
to start them moving.
|
|
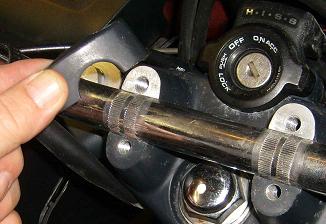
Remove
all four bolts and lift away the clamps. Allow the handlebars to be pulled
up and forwards by the elastic strap, so you can get to the large 30mm
dome nut underneath the centre run of the handlebars.
|
|
|
|
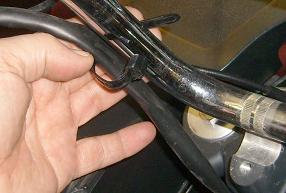
Remove
any cable ties which secure the switchgear harnesses to the handlebars.
|
|
Slacken
off the capscrew which secures the top of each
fork leg to the yoke. There is no need to remove the screws, but it would
do no harm to slip them right out and drip some ACF50 onto the threads,
to prevent corrosion in the future.
|
|
|
|
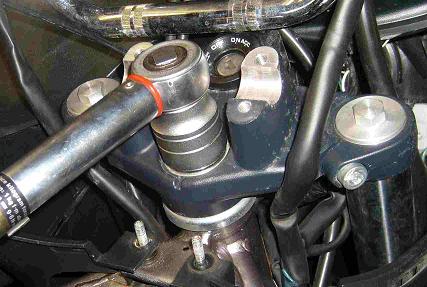
Use
your 30mm socket to attack the dome nut. This is a tight one and you
might need to either turn the forks fully left or ask a helper to stand
astride the front wheel and prevent it from moving as you unfasten the
dome nut. If a normal ratchet or ring spanner won't shift it, you'll
need an impact driver - try your local Halfords or car accessory shop.
An adjustable wrench is unlikely
to be able to move this very tight nut.
|
|
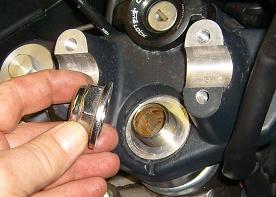
Remove
the 30mm dome nut.
|
|
|
|
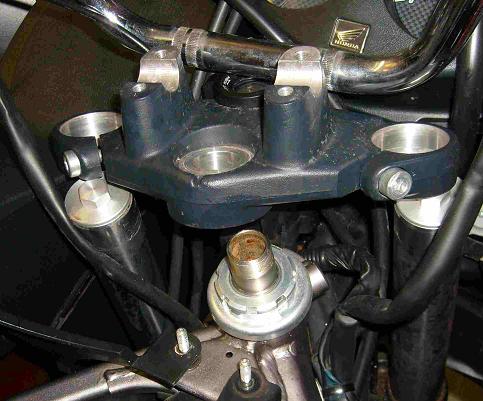
Wriggle
the black yoke off the top of the fork legs, taking care not to disturb
the lie of the front brake master cylinder on the handlebars.
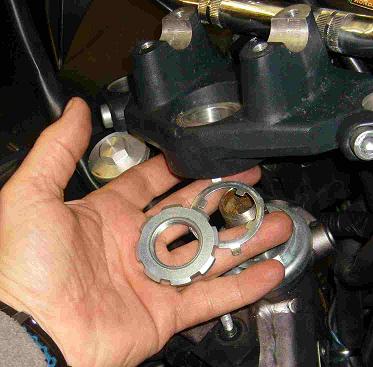
The
steering bearings are tightened or loosened by turning a large diameter
ring which is held in place by a locking ring, itself secured by a tab
ring. The locking ring has slots into which the tabs of the tab ring are
bent upwards to prevent movement as the steering is used.
|
|
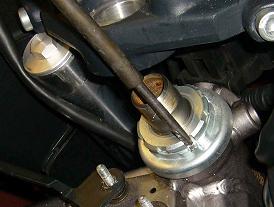
Use
a screwdriver to gently bend flat the tabs.
|
|
|
|
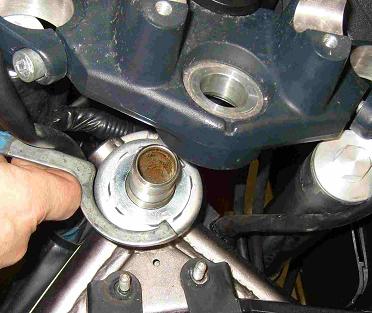
Use
your C-spanner to loosen and remove the locking and tab rings. Underneath
you will finally see the adjusting ring.
(Home
DiY mechanics who are
unable to find a C-spanner usually make do with a thick bladed screwdriver
and a hammer. Shock, horror etc ... but I haven't told you that.)
|
|
To tighten the bearings (to cure handlebar
oscillation) , use the C-spanner to turn the adjusting ring clockwise.
To loosen the bearings (to cure rolling) turn the adjusting ring anticlockwise.
Here,
I'm tightening mine.
A
tricky question is, how much shall I turn the adjusting ring? This is
a difficult one to answer because you can't test the bike properly until
everything is reassembled.
If
you're tightening, turn the adjusting ring 1/8 of a turn clockwise and
check the handlebars for free movement and check the fork leg bottoms
for play. If you have no play and clean, free movement, stop. Otherwise
try another 1/8 of a turn, and so on. Be prepared for some trial end error.
If
you're loosening, the opposite applies. At no time should you have notchy, stiff steering movement or anything more than a slight
'bendy' feel at the fork leg bottoms, as described at the top of this
page.
|
|
When
you are happy with the adjustment, replace the tab and locking rings. Tighten
the locking ring to 18 ft lbs; with a C-spanner you'd just have to do it by
feel! I've quoted the ft/lbs level so anyone with the right equipment could
do it, but I accept that most of us would use an educated guess.
.
Bend the tabs
back up into the corresponding slots on the locking ring. Give a squirt of ACF50
onto all threads before reassembly, to prevent future corrosion.Wriggle the
yoke top back and tighten the
top capscrews to 17 ft lbs. Note that on my Deau I positioned the left hand electric harness aft of the
yoke, but the right hand one underneath, as this gave
the most free movement of the steering without stretching either electric harness.
Replace
and tighten the dome nut to 76 ft lbs. I have no idea how you are going to do
this. I have no means of measuring the torque as my torque wrench only goes
up to 50 ft lbs. So under the Law of Bodges, I tighten the thing up to 50 ft
lbs and then as hard as I can without rupturing myself, before using a hammer
to thump the ring spanner or ratchet handle round some more. Good Luck. (ps
... I've never had one come adrift so the technique can't be all that bad.)
Release
the handlebars from the elastic strap, position them as you want them on the
yoke top and replace the arch clamps, tightening the securing capscrews
to 20 ft lbs. Replace the cable ties and black plastic
tabs over the capscrews.
Again
check for correct steering movement and free play, and do
a push-pull test at the bottom of the fork legs.
Finally
check that all the electrics work correctly, and then replace the fuel tank
if you took it off.
Daniel Card
says : "I've just followed your excellent step by step 'how to' page
on the above. As I've done with other jobs on the bike and its fixed the problem
I had with getting a knock over speed bumps and a bit of weave if I let go of
the handlebars. The tip about the the bungee round the handlebars was particularly
good."
You are welcome to comment
on these pages but you must manually remove the extra 'z' from the email address.
