 The
Red Fox says : "It's not how fast you ride safely - it's how safely
you ride fast."
The
Red Fox says : "It's not how fast you ride safely - it's how safely
you ride fast."How To Ride Fast and Safe
Rob Davis, Telford, Shropshire UK
Honda Deauville 650 and BMW F800GT
 The
Red Fox says : "It's not how fast you ride safely - it's how safely
you ride fast."
These pages are intended to be printed and studied by motorcyclists wishing to increase their riding skills. It will be necessary to practice these techniques out on the road.
Although I hope that the basic principles of advanced riding are clear enough to all readers, note that here in the UK we ride on the left hand side of the road. All the instructions on this website refer to UK roads, and any signs etc in the photos are all from the UK. Whilst Eire, Australia, New Zealand and Malta, plus some others, also drive on the left, readers based in countries which drive on the right hand side of the road will need to make the necessary "right" and "left" translations. As for the photos and diagrams, try reversing them in an electronic paintbox!
I am very receptive to comments and suggestions, but you use these pages entirely at your own risk.
The section covering Riding In Convoys is at the end of these pages.
Return to the Red Fox Deauville Web Resource
|
Phooey "Yeah, yeah. I don't need any of this rubbish. I've been riding / driving for 15 / 20 / 30 years and I'm an experienced, safe rider." All I can say is, "With respect - we can still improve your skills." "I've seen these so-called advanced riders. They ride like ninnies on a picnic outing." Even if this was true - which it isn't - rather a live ninny than a dead hothead. I used to think just that, even as a Silver (Intermediate) Instructor, well versed in roadcraft. Then I took the course to qualify as an Advanced (Gold) instructor, and it was a real eye-opener. I learned more about roadcraft from my training officer (Keith Hart of the West Midlands Police) in two weekends than in all the rest of my motorcycling career. I learned to apply procedure to cope with hazards, allowing me to recognise them. I learned about positioning and how vital it is. I learned how to ride like a police officer, and how all those things made other road users see me. After I'd finished, and passed, I rode the way that Keith taught me. I can tell you that there have been three definite occasions (two were on the same trip) when if I had not been riding to this standard, I would have been killed, or at least seriously injured. And, countless - probably on almost every ride - incidences when riding to this standard has prevented a mishap or minor accident. The weekend after I passed, my MD followed me into work. As we were parking up and walking inside, he said, "Hey up Rob, you ride just like a copper." If that isn't the highest praise possible, I don't know what is. Stephen Ross (Victoria, Australia), says (November 2016) : "I tried your techniques; Horizon Parallel vision; Correct Speed before the corner; Rules of judging corners; Over taking space; Left right location to maximise corner vision; and Group formation. WOW - 10 to 15 kmh better speed - more control - and the Deauville felt really planted on the road and well within its and my capability. Really surprised by the Judging Corners tip - I was sceptical - but it really works. Thank you so much for sharing this knowledge." |
|||||||||
|
What makes me qualified to preach this doctrine? Both as a motorcyclist of 50 years' standing and as a former Star Rider Gold (Advanced) Instructor (AMI 2983) and as a former Part I Test Examiner (AME 2983), I have taught riders from absolute beginner level to the standard required to obtain the highest possible civilian motorcycling qualification. I also plan and execute a European annual motorcycle tour, so have considerable experience of foreign roads. See my Touring page. I ran two Star Rider centres in Leicestershire UK (Hinckley and Market Harborough) and would be pleased to hear from former trainees, or fellow instructors of the sadly defunct National Motor Cycle Training Scheme. |
As little boring text as possible I'm not giving you 5,000 words on how to change gear and I am not going to waste your time and patience going through the sometimes pedantic "Police Roadcraft System of Motor Cycle Control". Instead I'll explain each topic, simply and in turn. "Nearside" means the side of the vehicle closest to the verge or kerb. In the UK, this means the left hand side of the vehicle. "Offside" means the side of the vehicle furthest from the kerb. In the UK, this means the right hand side of the vehicle. |
||||||||
|
Headlights In some countries, daytime headlights or running lights on motorcycles are compulsory, but here in the UK they are not. I don't think daytime headlights make any difference at all to being seen, and they serve only to annoy other road users. Also, it is far more difficult to judge the distance and closing speed of a bike when all you can see of it is a blazing headlamp. I don't ride with lights on in broad daylight because I know that positioning and roadcraft are three times as effective at ensuring that (a) I see other road users, (b) they see me, and (c) I am somewhere else when an accident occurs. When should you show headlights? Easy. When you wish other road users would use theirs. And, NEVER run on sidelights. Dipped headlights or nothing, please. However, most modern bikes have their headlights permanently wired on. Fit an off switch if you wish ... I've done this on my Deauville, but not on the BMW. |
|||||||||
|
Hazards You'll read a lot about hazards, so let's clarify what constitutes a hazard. "A hazard is any condition or circumstance where there is an increased possibility of an accident occurring." Examples Condition or circumstance ----- Why it's a hazard ----- What to do about it Junction ----- Vehicle pulling out in front of you ----- Position yourself to see and be seen; be ready to slow down, take evasive action, or even to stop. Distancekeeping ----- Vehicle in front may suddenly brake hard ----- Keep your two second safety distance (details later) Entering motorway from slip road ----- You may be hit from the offside quarter ----- Lifesaver before entering traffic flow Hump backed bridge ----- You can't see what is coming or what is on the other side of the hump ----- Slow, controlled approach; sound horn; assume there is something that will hit you until you can see that there isn't The last 3 miles before arrival at destination ----- You're tired and looking forward to that cup of coffee ----- Concentrate harder. Forget the coffee. Think about the roadcraft. |
|||||||||
|
What are we trying to achieve with these techniques? The end result of applying these techniques is a smooth, unflustered ride, giving yourself (and perhaps a pillion passenger) a clean, smooth, apparently unhurried ride, without harsh acceleration, braking, or manoeuvring. Once you understand, have practiced and mastered the points I give you, you'll be astonished at how much more progress you can make with much less effort. You won't be caught out by sudden bends, drivers pulling out in front, you won't misjudge bends, and you will make extremely smooth progress through traffic, particularly in urban conditions and whilst overtaking. If you're still thinking "Yeah, yeah, what can a few simple techniques do for me?" all I can say is, trust me, and apply the ideas. They really do work, and they're not awkward or complicated to use. Even if this prevents one single incident, isn't it worthwhile? Also, with practice, you can learn to make 1000cc progress on a 500, work less hard and stress your bike, yourself and your insurance company incredibly less than before. You can ride 250 miles, make far better progress with less effort than before, and still be fresh and ready to do it again if necessary. I was once out with a pal (Mark Berry) who had a Z1000, I was on my CX500. On a clear cross country road he streaked off. He wasn't one of my Gold trainees and had no idea how to ride to Advanced standard. After about fifteen minutes of what was, for him, spirited riding, overtaking left right and centre, he looked in his mirror for the first time and saw me still glued to his tail. I will never forget the look of astonishment on his face. When we arrived home he signed up for the Gold Course (and later went on to be an Instructor). He said "I just didn't believe a 500 could possibly have kept up with me." I had certainly worked my bike hard, but I wasn't flustered, and I hadn't taken any risks. Later he said, ruefully shaking his head, "For the first time, I understood how fighter pilots can get shot down without ever seeing the enemy aircraft that got them." |
|||||||||
|
Signals When you were being taught to ride / drive, you were probably instructed to signal for each and every manoeuvre. However, there is no point in giving a signal when there is either nobody to see it, or nobody to benefit from it. So, in some cases, you will move off, turn, overtake and so on without giving any signals at all. The general rule is "Only give a signal if it would benefit someone else." Any signals you do give should be given in plenty of time, be clear, and be cancelled after use. Also, on a motor cycle, a confirmation arm signal is occasionally useful. For example, when approaching a left turn where another vehicle is about to emerge. The other driver should not assume that you really are going to turn left, and should wait until you have committed yourself to the turn before pulling out. If you give an arm signal to support or reinforce your normal signal, this is unmistakeable - you can't leave your arm sticking out by mistake, the way you might leave a turn signal running. Arm signals are done "from the elbow" like a Royal Wave. Don't stick your entire arm out, and don't look over your shoulder during an arm signal. If you should hit some debris in the road, you need both hands on the controls. Personally, I would not signal to overtake a parked car, because I am clearly not going OVER it but AROUND it. Also, I don't signal to pull back in after overtaking - this is completely unnecessary. Don't waste effort giving unnecessary signals. If the road is empty, or other traffic is so far away as not be able to benefit, don't bother to give that signal. |
|||||||||
|
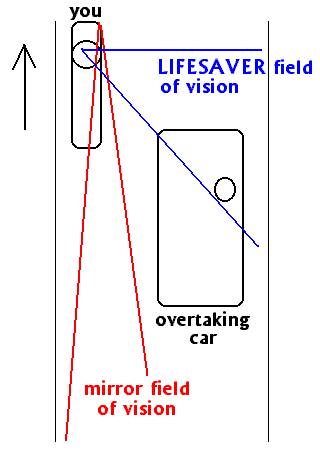
Observation We don't call it the "Lifesaver" for nothing! Look over your shoulder before you move off, turn, overtake, and before any manoeuvring. Your handlebar mirrors have serious close-up blind spots and they won't show the vehicle that kills you when you turn into its path. Typically, this is when you turn right into a side road as another vehicle overtakes you. Or, on exiting a motorway onto a slip road as some prat overtakes you on the inside. Not your fault, but wham! (Note that, contrary to the US, in the UK it is illegal to overtake on the nearside, unless the target vehicle is turning right, or you are in slow-moving lanes.) Use your mirrors, yes - even fit accessory-type wide angle mirrors - but use the Lifesaver before turning.
|
 |
||||||||
|
Stopping and Moving Off These instructions are for a "normal" left foot shift bike. If you happen to ride a right foot shift bike, you need to reverse these lefts and rights. Stop using both front and rear brakes, and with your left foot down, giving full control over both both brakes. Change feet and select neutral. Hands off, but if you are on a slope, keep your right hand in place, and use the front brake to hold the bike. When preparing to move off, select first gear, change feet (change brakes if on a slope). Move off, covering the rear brake. Why? So that you can stop suddenly on the rear brake, if you need to. Someone jumping the lights maybe? I hear you saying "Yeah, yeah, but I can control the throttle and front brake at the same time." I'm saying, "No you can't, not safely." Why take the risk? This manoeuvre is called the "Hendon Shuffle" as it was allegedly developed by the Hendon Academy (Metropolitan Police) riders. Using it is a dead giveaway that you are an advanced rider. Dave Price comments "We [in Australia] were taught the Hendon Shuffle, but then to wait in first gear, to be ready to move off in a sudden emergency, such as a driver behind not stopping - and you hear that dreaded squeal of tyres behind!" The answer is that waiting in neutral prevents your bike from launching itself, if you are shunted or struck from behind. |
|||||||||
|
Distance Keeping This is the easiest one in the book. When the vehicle in front of you passes some visible point such as a crack in the road surface, a manhole cover, a traffic sign etc - say aloud to yourself:-
In the rain, you can add "... when it's pissing down with rain." Or you can add "... when I'm tired after a long ride." etc to increase the safety margin. If you have reached the visible reference point before you have completed the doggerel - well - no prizes - you are too close. Back off. Works in your car as well. |
|||||||||
|
I'm being tailgated, what should I do? Firstly, give the driver behind a clear "please back off" signal, "pushing him away." If this doesn't work, whilst it's tempting to slam on the brakes and then accelerate smartly away, there is a much more subtle method. Stay in your normal riding position on the road (2/3 out, see next section) and gently slow down, forcing the other driver to slow as well. Don't look behind, use the corner of your eye in your mirror. When you have opened up a nice gap in front of you, accelerate quickly away up to your safe distance. It's rare to need to deliver more than 2 doses of this to the driver behind. |
Positioning For normal riding, you should be 2/3 of the way across from the nearside of your own lane. Why? Because then you are master of your own patch of road. Ride 1/3 or 1/2 way out, and you leave a gap just inviting someone to overtake and snick past you when there isn't room; and bump you off your bike. Also, and more importantly, from here you are much more visible to other road users. |
||||||||
|
Junctions - side turnings When approaching a left side turning, look into it. Is a vehicle emerging? Remember that you will see the bonnet (hood to Americans) of his car long before he can see you. So move out to the crown of the road - increase that angle of view into the junction. You'll see him better. He'll see you earlier.
You can apply this positioning technique to any hazard where you will benefit from an increased depth of view into or around the obstruction. Typically, at the approach to a crossroads, where being at the crown of the road not only improves your depth of view into the hazard, but also makes you far more visible to anyone thinking about pulling out. Keld Petersen comments "One more reason to be at 2/3 (at least). You have to ways to to turn if something suddenly appears in your way (very important here in Sweden where we have animals (sometimes big ones) coming up on the roads). although when its raining the 2/3 often is in the worn down tracks from cars, where water gathers. Then I choose to either go 1/2 or 99/100, depending on traffic." |
|||||||||
|
Hey! Here I Am! Has that motorist seen me? (You know that the other motorcyclist did, because he nodded back at you, right?) But what of the car driver? Is he going to pull out in front of you from that side turning? 1. Watch his wheel trims. If they move even a fraction, you'll see this movement far more easily than any other tell-tale sign.
2. Watch his eyes. If he has seen you, you'll probably see him see you. 3. I'm not sure he's seen me. Stare at him. Hard. Square your helmet at him, and glare. Give him the Policeman's Stare. It works, believe me. 4. In a situation where you want to improve your chances of being seen, it's permissible to gently weave your bike from side to side, to make you "move about the road" more. This extra motion does make you stand out better, and is useful when approaching a junction where you can see vehicles emerging. It's the opposite effect to a hunted animal keeping still and avoiding being seen. Oh yes, whilst I remember, horns are warning devices, not gun buttons. |
|||||||||
|
Traffic Flow Another hallmark of a well trained rider is the ability to merge seamlessly with traffic flow, particularly at junctions and roundabouts. This is done with observation and anticipation and allows you to make far better progress, with far less effort, than untrained riders. At the approach to a roundabout, look carefully at the traffic flowing from your right. You can't always make this technique work, but try to coincide your arrival at the entrance to the roundabout with a suitably sized gap in the flow of vehicles already on the island. This is done by careful observation, gentle and subtle control of power and brakes, remembering that you want to get as smooth a flowing ride as possible. If you time this arrival correctly, you will be able to enter and negotiate the island without having to stop. One valuable extra edge here is that if you arrive at the island in time for that space in the traffic, as you are already moving, you will be able to accelerate far more quickly and smoothly than a vehicle which is stationary. This gives you a tremendous advantage over what may well be a more powerful vehicle. Plus, it gives you, and your bike a clean, smooth ride. The same technique is also applied to traffic lights which are on red as you approach. Slow down smoothly and trickle up to the stop line or the stationary vehicle in front. Careful observation of the lights controlling traffic in the opposite direction, and / or of the Pelican pedestrian lights, give you an edge in judging when your lights will change to red+amber, then green. Again, arriving at the stop line at the exact moment the lights go green allows you to be still moving - however slowly - and you can easily accelerate away from other vehicles, making far better, smoother progress. |
|||||||||
|
Cornering With all manoeuvres, the approach to it is the key to success. A corner or bend is negotiated correctly if:- 1. You exit it on the correct side of the road 2. You can stay on the correct side of the road 3. You can stop in the distance you can see to be clear. |
Angle of Dangle
When cornering, although your bike naturally leans or banks over, always keep your head vertical in relation to to road surface. This maintains your perspective of the bend, and greatly assists your balance. This is an old Pilot's trick. Next time you are on a fairground ride, being turned this way and that, try to keep the line of your eyebrows as horizontal as possible. It's astonishing how this preserves your orientation. It's rather like the artificial horizon instrument on an aircraft. |
||||||||
|
How Steep Is That Bend? This is easily judged with a little practice.
As you approach, look as deeply into the bend as you can, and assess the depth of your view "gaining towards the farside verge" in relation to how much distance you are "losing as you approach the nearside verge". |
|
||||||||
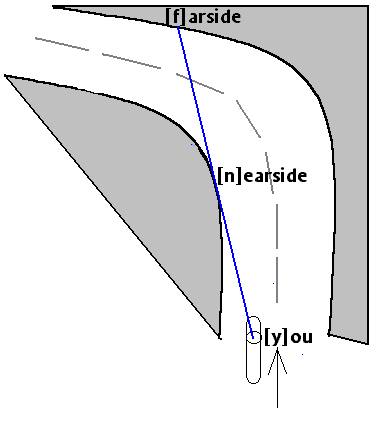 |
In this diagram there are two distances to be judged; Y (you) to N (nearside verge) and N to F (farside verge). As you approach the bend, the distance between Y and N will obviously decrease. But as you look into the ground beyond the nearside verge, assess the distance between N and F. If the N-F distance is decreasing at the same rate as Y-N, the curve of the bend is steady and constant. I.e. it is not opening up or straightening; if it was, you would be able to see further down it. If N-F is decreasing faster than Y-N, watch out, because the bend is tightening. Its curve is increasing so you can't see so far down it. If N-F is increasing more than Y-N is decreasing, the bend is opening out, allowing you to see more of it as you approach. |
||||||||
|
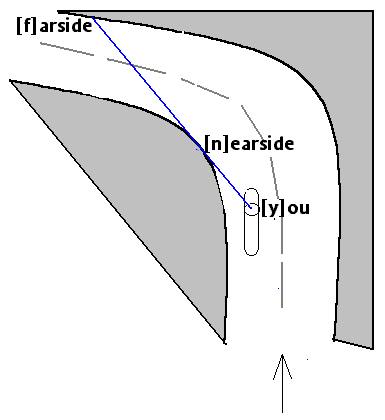
In this diagram the bike is deeper into the bend, which is now opening up, and the N-F distance is inceasing accordingly. This is all a matter of practice and experience. What I suggest is that you take a ride, or even a walk, round some bends you know very well, and try out this method. Believe me, it works, and once you understand it, you will NEVER get taken by surprise by a bend, ever again. Isn't that a good idea? |
 |
||||||||
|
|
Left Hand Bend REMEMBER that these were filmed on UK roads where we ride / drive on the left. If you ride / drive on the right, put the images into an electronic paintbox and mirror them. Then reverse the "right" and "left" in the text. The techniques will still work. On the approach, move out to the crown of the road to improve your angle of view round the bend. WRONG! What can you see from here? Sweet Fanny Adams! You are positioned far too close to the verge. You cannot see around the corner and you don't know if the road is clear. There may be a broken down car, a piece of debris, a pedestrian, or a herd of elephants, just out of view.
|
||||||||
|
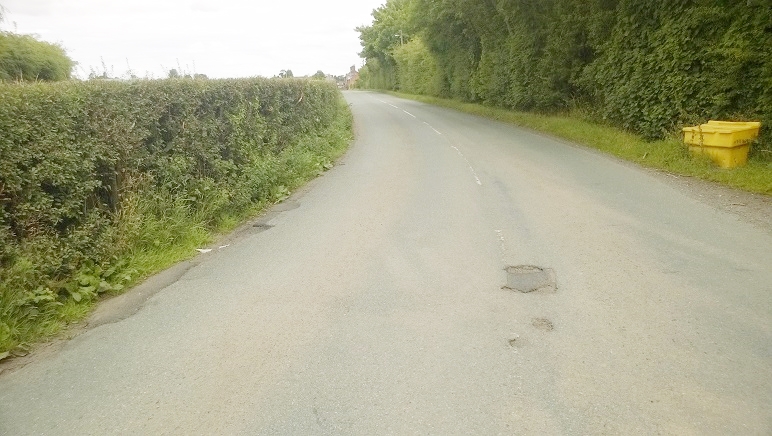
RIGHT! Exactly the same bend, from exactly the same distance, but from the crown of the road. Now you can see that the bend is clear and there isn't a hazard. What a difference 2 yards to the right (and a litle training and practice) makes! |
 |
||||||||
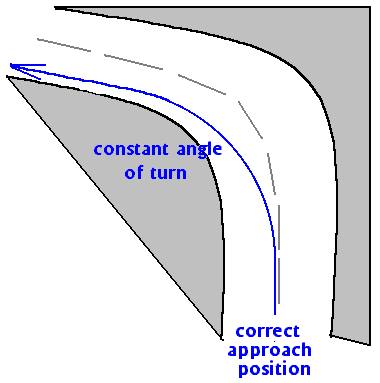 |
Get all the braking and gearchanging done on your approach, and then line up at the crown of the road to maximise your view into the bend. Once you have approached the left bend from the correct position, and seen it to be clear, you will be able to negotiate the bend at a constant speed and on a constant angle of bank. If it's clear, bank over and hold the bike at a steady throttle, steady rate of turn and this will make you exit against the verge. Why? So you and your bike will be evenly balanced on both wheels; you won't have to slow down suddenly, brake, or change your line. Any of these things can cause you to lose control. As you straighten up, accelerate. |
||||||||
|
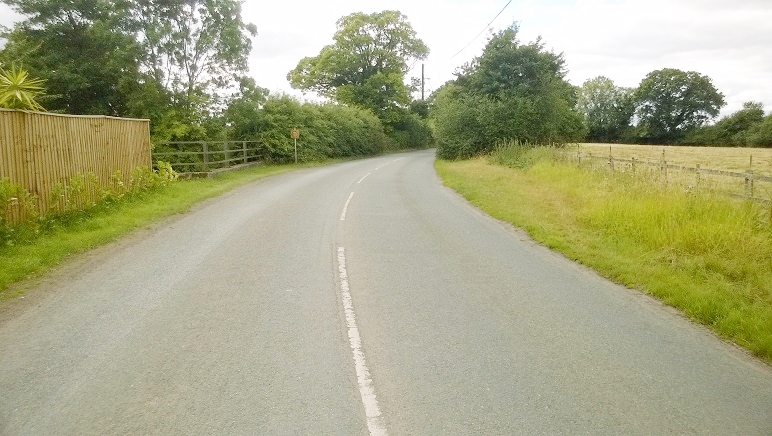
Right Hand Bend Apply the same principle, but in reverse. WRONG! Here you have approached the bend from the crown of the road. What can you really see? Something ... but not enough to know that Farmer Jones isn't driving his tractor at 5 mph, just out of view.
|
 |
||||||||
 |
RIGHT! The approach is from close to the verge, and you can see so much further around the corner. So Farmer Jones's tractor with the long spikes on the front isn't going to get me. Nor are the sheep he is herding across the road. Also I can see that there is another bend coming up, and I can get ready to position myself for it. |
||||||||
|
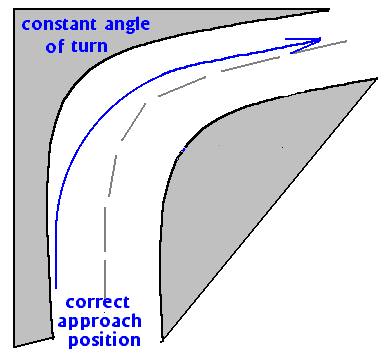
As with the left bend, get all the gearchanging and braking done in advance, on the approach. Position correctly against the verge. When it's seen to be clear, hold speed, angle of bank constant; there should be no need to change anything. You will exit smoothly against the crown of the road, where you accelerate. Why? So you and your bike will be evenly balanced on both wheels; you won't have to slow down suddenly, brake, or change your line. Any of these things can cause you to lose control. As you straighten up, accelerate. Easy when you know how. Practice on some bends you already know, then try it on some new roads. IT WORKS! |
 |
||||||||
 |
Overtaking First - How Not To Do It WRONG! Get up real close (left) to the vehicle in front. Peer around its offside. When you think it's ok, drop a gear or two, accelerate to the redline and blast past. Why
not? Firstly, you can't stop in an emergency. Secondly, you can see
naff all except the rear of the vehicle in front. Thirdly, you have no
room to accelerate. Fourthly, you have nowhere to abort to if you need
it. Fifthly, you are treating your engine badly and annoying other road
users. The Red Fox says : "Just watch the untrained riders (and drivers) following too close, dodging in and out, struggling to see what's coming!"
|
||||||||
|
Here's How You Do It Properly. HANG BACK - RIDE WIDE. Get to your safe distance, or even further back, and you get a wide-angle view of the road ahead.. Why? Because you can see, you have space to stop, space to accelerate, and somewhere to go if you need it. Also, you are within the mirror view of the target vehicle, reducing the possibility of him moving into your path. 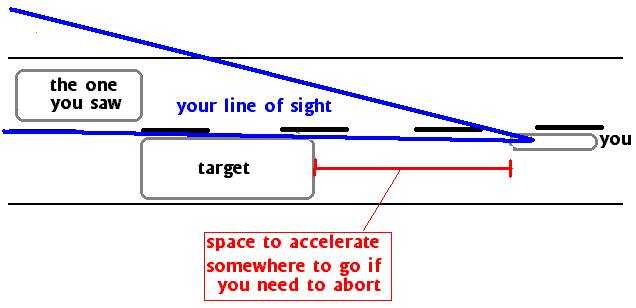 |
|||||||||
|
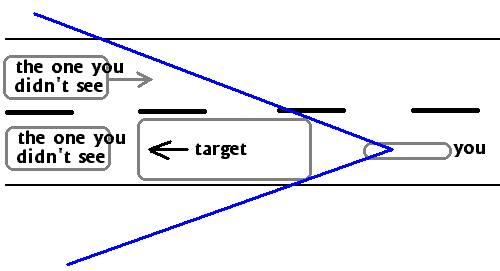
Move to your nearside, and have a good look (below) up the target's nearside - can you see another vehicle tucked in front of your target?
|
|||||||||
|
Can you see some hazard such as a cyclist, a bend in the road, a village, a junction or crossroads, in the distance? What I am saying here is, can you see any reason NOT to overtake? Don't overtake over junctions - a vehicle you didn't see may slow down, stop, or pull out in a hurry. Consider two identical bikes, both at the same speed, one six feet from the target and one fifty feet from the target. They both accelerate together. By the time the rearmost bike reaches the target, he has accelerated far more that the nearmost bike has been able to, because he left room for the bike to pick up speed.
If it's clear, look over your offside shoulder (to make sure nobody is in your blind spot), accelerate firmly and move out to take command of the other side of the road, and if you ride wide, again the view opens right up and you can see what's ahead. If something unexpected happens - perhaps as the view opens up, some hazard becomes apparent - you can easily slack off the throttle, brake gently, and ease your bike to the left, without mad braking or any panic. Drop back to your distance, and start the overtaking procedure again. By the time you are alongside the target, you should be cruising not accelerating. If you think about it, the safest place to overtake is a steady right hand bend - because you have the best possible view down the road!
|
|||||||||
|
An Extra Edge : the Preview On the open road, whilst looking for the right opportunity to overtake, maintaining a long safe distance gives you that wide-angle view of the conditions ahead, which is denied to the rider who tries to overtake from up close behind. You can gain an even bigger advantage by taking a preview of the road ahead.
Check your offside blindspot and if clear, move laterally across the road without gaining ground. Now you can see so much better. You will get an excellent view from here for a left hand bend, as well as for overtaking. Some people have seen me do this and said "but you're on the wrong side of the road, that's dangerous." The answer is, "Not as long as you can see what's coming or what hazards are ahead. Also, what's coming can see you much earlier; you can handle the hazards better." However, don't use this preview technique in urban conditions. It isn't necessary, and there are more problems with it (kids playing etc) than there are on the open road. Why bust a gut? Do it properly! In my experience, correct positioning and overtaking is worth another 75% engine power. Practice and Experience All these techniques are simple and effective ways to prevent you meeting something you didn't know was there, and there are no magic tricks involved. Everyone can do it from a moped to a Gold Wing, and to a lesser extent you can apply positioning to your car driving as well, although you have less road to use, cars being wider than bikes.
|
|||||||||
|
Convoys Participating in a convoy of advanced riders is extremely satisfying. It's the nearest you'll get to flying Red Arrows formation. The nice thing about it is, as you are all riding to the same same standard and applying the same rules and procedures, you'll always know what the others are going to do. > Agree a Leader, whose job it is to navigate and set the pace. Everyone should have the opportunity to lead and deputise. > Brief the riders in advance on the destination and route. Agree to stop at intervals to allow rests / refuelling / general checks / to change the running order. Give a general mobile phone contact number. > The speed of the convoy is that of the slowest bike or rider in the convoy. If you have three Pan Europeans and a moped, your convoy speed is 30 mph. > No overtaking within the convoy. If a rider breaks down, all riders behind should stop. > Riders should keep the vehicle in front and the vehicle behind in constant view. > The Leader and Tail End Charlie should wear something particularly obvious such as a particularly coloured hi-visibilty vest or jacket. If the leader can see this, everyone is present and correct. > Most experienced navigator generally directly behind the leader. > Most experienced mechanic generally at the rear. > On an organised long trip, riders will find it advantageous not to double up on the various tools carried. For example, nobody need bring a torque wrench if another rider has one. (Ever seen any Battle of Britain or fighter-pilot films, or read any of these type of books? The formation used is very similar to the "Rotte" and "Finger-Four" formations perfected by the Luftwaffe fighter pilots, and rapidly copied by the defending RAF.) CONVOY
: Normal Riding Position is a series of pairs, staggered and
evenly spaced (below). On the open road, it is predominantly the
task of the leader of each pair to watch the road ahead, and for his pair
to watch the road behind. CONVOY
: Closed-up position at a stop light or junction (below). Pairs
draw alongside to minimise the "footprint". This, and moving-off,
done as a group, is very impressive to watch from behind, and shows a
disciplined, well drilled formation. CONVOY : Preparing to overtake. (Below) The signal to prepare for an overtake is the leader giving a very obvious look in his offside mirror. His No 2 should be ready for this, and they swap positions to give Leader the best view. No 2 watches developments behind, warns Leader by horn or radio if a hazard develops.
CONVOY : Overtaking pair by pair (below). Leader overtakes. No
2 moves to overtaking position, to get best view. Leader, if safe to do
so, gives Clear Road Signal (explained in next section) once he has completed
the manoeuvre. On a motorway or dual carriageway, the technique is slightly different. On seeing the preparatory signal, the two riders don't swap places. Instead, No 2 checks behind and moves out into the next lane, without gaining ground , to "hold" the lane ready for the leader to come out. However, what you can't afford to have happen here is for another vehicle to slot in, in front of No 2 after he has moved out, as there is a possibility of a collision between No 1 as he comes out, and the vehicle which slotted in. No.1 does not need to move out under excessive power and leave No.2 behind - just start the overtake normally. Clear Road Signals When riding in pairs or a group, it is often necessary to overtake as a queue, and then wait for the rider(s) behind. This is simplified if the rider who has just overtaken, and who can see more of the road ahead than anyone else, gives a Clear Road Signal. This is simply the left (clutch) arm raised fully above the head. This means "I can't see any hazards from where I am." He then maintains his line of sight to the rider who is next in the queue, and does not zoom off far ahead where the next rider can't see him. The next rider to overtake, however, must himself make the decision to actually overtake. The rider giving the signal should hold his arm up whilst the road is clear, but snap his arm down the instant he sees a hazard ahead. Given that all riders trust one another and ride to the same standards, the Clear Road Signal is a great help to those behind. In a group situation, a clear road signal can be repeated "down the line" from No1 to No 2 to No 3. Inter-rider Signals For advice and information on helmet-to-helmet communication, see my 'Touring' page regarding Bluetooth headsets. Bike at roadside with helmet against rear wheel means "I need assistance." Hand held palm down over head means "I am on my reserve fuel tank." Rider ahead raising left (clutch) arm fully is the Clear Road Signal and means "I can see no hazards." The arm is rapidly withdrawn at the first sign of a hazard. Index finger raised at arm length and rotated means "Start your engines." Clenched fist raised to arm length and pumped up and down means "Stop your engines." This is more visible than a "throat-cutting" signal. Thumb and forefinger joined in an "O" means "Are you ok?" Thumb up means "Yes." Thumb down means "No." Palm down and hand rolled from side to side means "I am not sure." Fist clenched means "I want to stop." Exaggerated scratching of helmeted head means "Which way at the next junction?" Hand extended rearwards, with fingertips alternately meeting and parting (like a flower opening and closing) means "You (or someone else behind) has left an Indicator running." |
|||||||||
|
Go To It Ok - now go away and work at it. You are welcome to comment on these pages but manually remove the extra 'z' from the email address. |
|||||||||