Items required : two new pairs of disc pads, 5mm Allen key, rubber hammer, pliers, 12mm socket or ring spanner, wire brush, torque wrench.
All nut and bolt sizes are quoted as the spanner size required to fit them.
Time : expert 30 minutes, average 45 minutes, "first-time" one hour.
All the hands, tools, and bike in the photos are the author's. In some of the photos I have had to wipe my hands clean before using the camera. I am very receptive to comments and suggestions, but you use these pages entirely at your own risk.
It is not necessary to remove the front wheel or disturb any of the hydraulic hoses to change the front disc brake pads. In the photos here, the bike's front wheel was only removed because a new tyre was being fitted.
 The
photos here are for the variant with the Nissin linked brakes.
The supplier assured me that the pads are the same for all models, but
I advise confirming with your own supplier that the earlier variants with
unlinked Brembo calipers will accept the same pads as shown
here.
The
photos here are for the variant with the Nissin linked brakes.
The supplier assured me that the pads are the same for all models, but
I advise confirming with your own supplier that the earlier variants with
unlinked Brembo calipers will accept the same pads as shown
here.
the Red Fox says : "Always change the brake pads on both calipers, as a set of four pads."
BREMBO (gold caliper, unlinked) or NISSIN (black caliper, linked) brakes?
The TOP section of this web page deals with the Nissin "linked" brakes as fitted to the Deauville V2 onwards variants. If your bike is the earlier V1 variant with the Brembo 'unlinked' brakes, the instructions for these are at the BOTTOM of the web page.
NISSIN 'linked' brakes
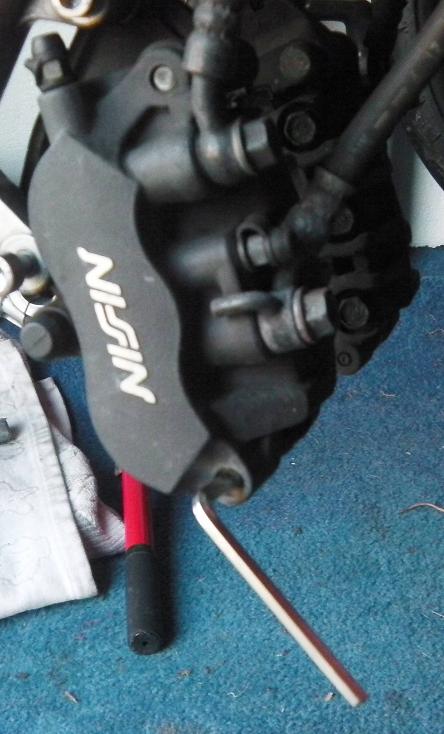
Starting with the left hand caliper, it is first necessary to remove the pin which secures the pads within the caliper body. This steel pin collects a lot of road dirt and can be very stubborn to dislodge.
I recommend that before you attempt to remove it, poke out the rubber covering plug and soak the pin's length with ACF-50 or other easing agent. It doesn't matter if this gets on the pads as you will be junking them, but avoid contaminating the disc surfaces.
It is much easier to remove this pin with the caliper body still bolted to the fork leg. Having poked out the rubber covering plug, use a 5mm Allen key to unscrew the locating pin.
I had trouble extracting one of these and had to resort to a large self locking wrench fastened to the pin as it passes through the eyes of the brake pad. With some heavy 'persuasion' the pin came out but was heavily scored. Consequently I bought a set of new pins from David Silvers. The pins are part number "45215MAJG41 - Brake pad hanger pin" £4.95 each (April 2012)
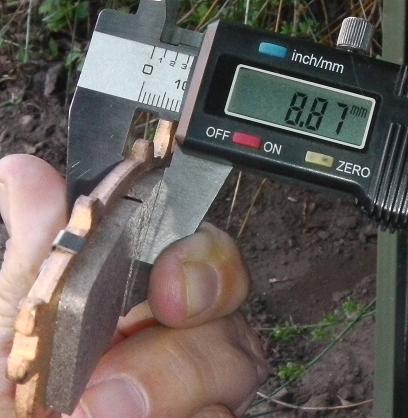
The new pads are almost 9mm thick, with the backing plate and steel anti-chatter plate.
As you remove the steel hanger pin from the caliper body, the brake pads will probably drop straight out as there is nothing to retain them.
Now remove the top and bottom 12mm bolts which attach the caliper to the fork leg, and lift away the caliper. (After completing this work I replaced these four bolts with stainless steel capscrews.)
Be careful not to operate the front brake, or the brake pistons will get pushed out by the hydraulic action and it can be tough to get them back again.
If you have to stop work, don't allow the detatched caliper to hang on the end of its rubber hydraulic hoses, as this will strain them unnecessarily. Hang the caliper on a bungee strap so that the rubber hoses are completely slack and are not bearing the weight of the caliper (see next photo).
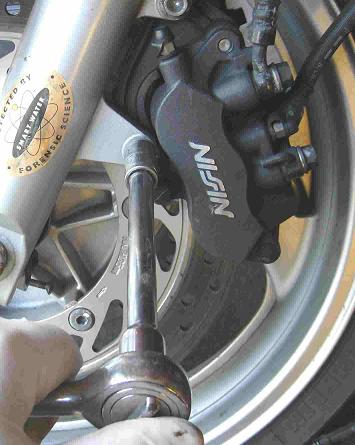
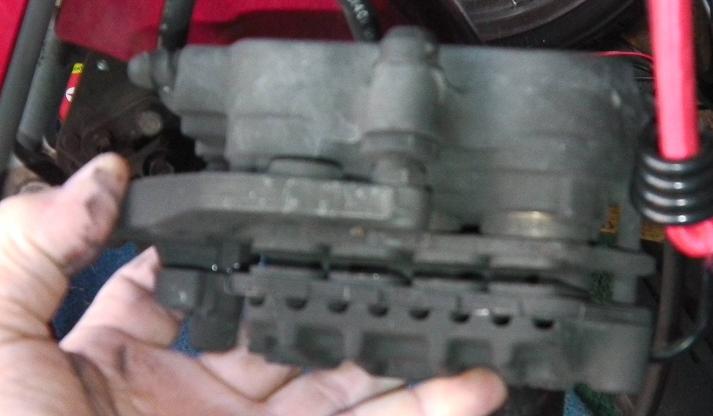
Here is a general view of the caliper underside. Use your wire brush to remove any accumulated dirt and give the caliper body and its mounting arm a good clean-up.
(This photo was taken before the old pads were removed).
Note that at the forward or upper end of the caliper assembly is a small stainless steel protection plate. The front tongues of the pads locate in this plate and it protects the softer aluminium of the caliper body from being eroded as the pads move against the disc when the brake is applied.
This plate may fall out when the pads come away, or you may have to tickle it out with a screwdriver, but don't lose it.
This view shows the pin and protection plate removed and cleaned up.
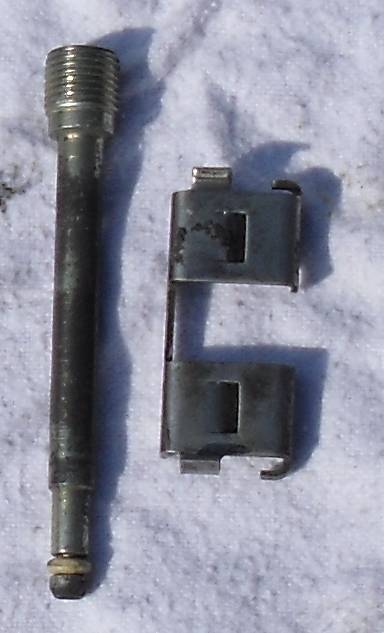
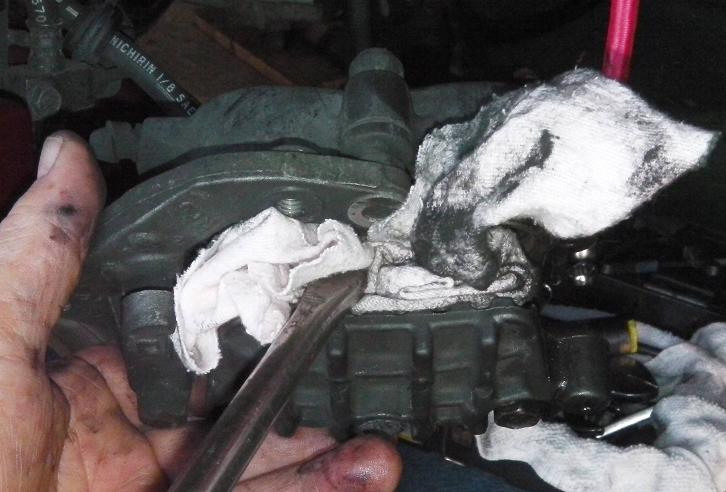
Give everything a good clean-up. You can use ACF-50 here as a cleaning agent and it's a good idea to very gently pump the front brake lever to ease the pistons out enough to run a rag behind them and clean out any debris.
Be extremely careful not to pump so much that the pistons are ejected or you are into a more serious brake rebuild! But get the caliper bodies and innards as clean as you can. Space to reach inside inside is limited so here I'm using a rag pushed in at the end of a long screwdriver, to get at the crooks and nannies. A toothbrush soaked in cleaning agent is a useful way to reach the recesses.
Reinsert the steel protection plate so that its slot faces outwards, away from the caliper body. It is through this slot that the brake disc rotates. If when you replace it, the plate won't stay in place, gently bend the 'ears' in a touch so that they grip the caliper body.
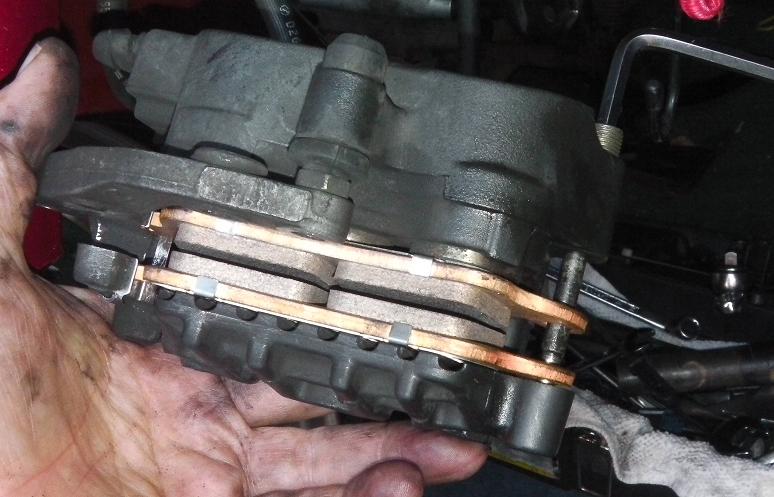
Insert the new pads as per this picture and press them down against the springs in the 'roof' of the caliper body, and slide in the retaining pin, tightening it finger tight with your Allen key.
Prise the pads about 6mm apart so that the disc can pass between them. It is actually possible to misplace the pads and have both of them on the same side of the disc (one owner has admitted to making this mistake).
As you offer up the caliper to the fork leg, be absolutely sure that the disc has passed BETWEEN the new pads and not to one side of them.
ACF-50 the caliper holding bolts. If you find it easier to first fit the caliper to the fork leg and insert the pads afterwards, this is fine, but there's less room to work and it's more difficult to see what you're doing.
Either way, torque the 12mm bolts to 22 ft/lbs and the pad pin to 12 ft/lbs and replace the rubber plug. Mop up any stray ACF-50 or cleaning agent.
Repeat this procedure with the right hand caliper.
BREMBO 'unlinked' brakes
Many thanks to Seamus (Dirtyshirt) who sent the pictures and prepared the text for this section
Tools required: Torque wrench, 12mm socket. Nose Pliers. Hammer, Masonry nail to use as "drift". Copper Grease, ACF 50. Pads Brembo 07BB03-CC or EBC FA209/2 (not HH) (FA140 rear)
Tthe procedure is similar to removing the Nissin caliper, however as the pad retaining pin is held in place with an R-Clip, there is no need to open a screw.
Whether you chose to open the caliper retaining bolts before removing the pad retaining pin depends on how wedged in the pin is.
Two 12mm bolts hold the calipers in place, as per the Nissin calipers on later models.
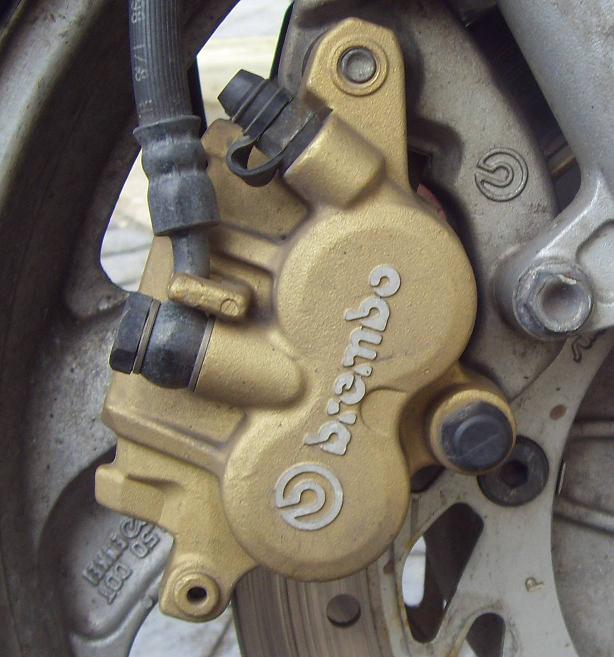
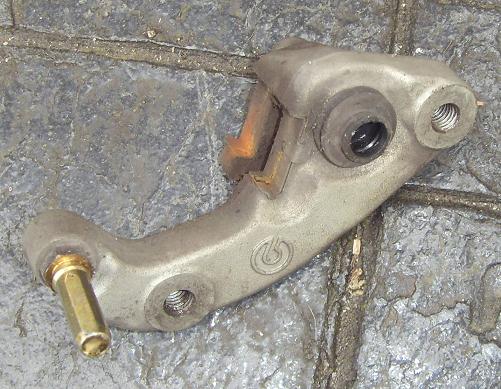
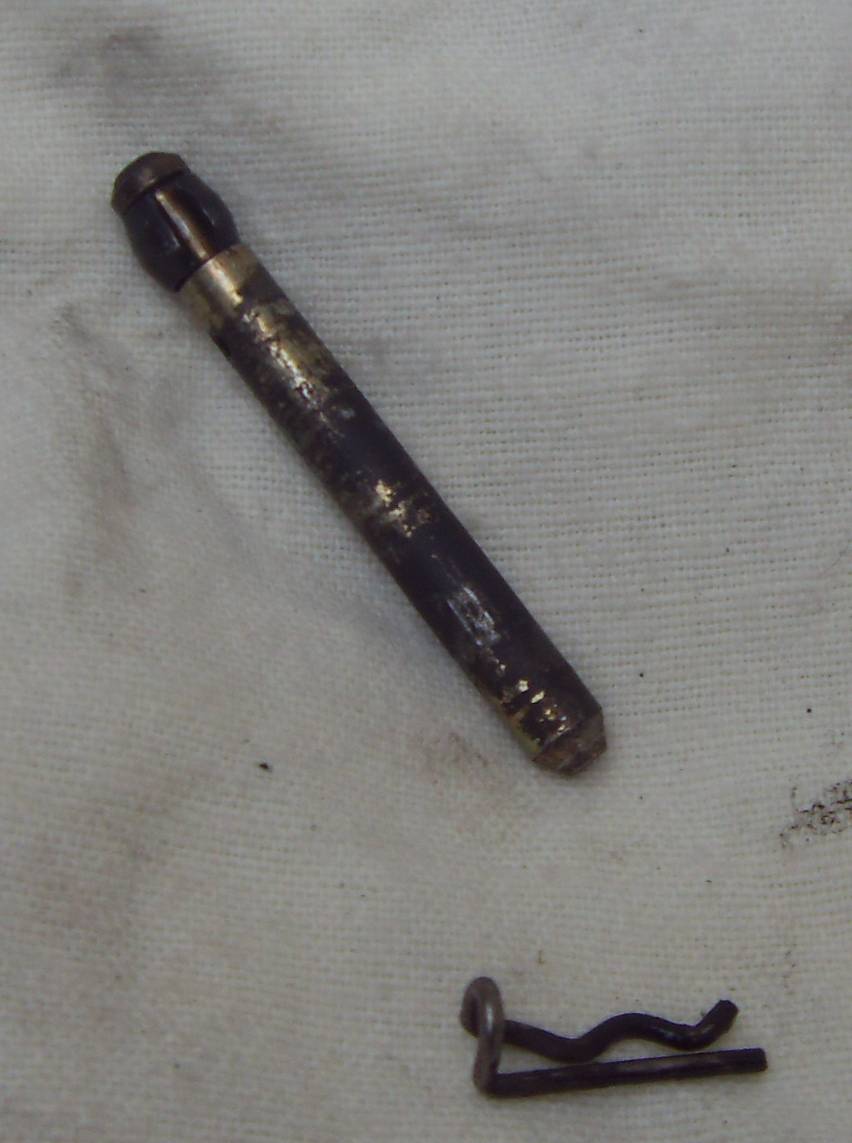
To removing the R Clip, nose pliers do it best but it should come out by hand, and the pin then needs to be drifted out. A masonry nail with the point flattened and a firm tap of a hammer worked for me.
Once the pin is out the plates will fall free. The pin itself is held in the caliper with an expansion collar. Road dirt, and brake dust do this pin no favours.
When you eventually get it out, give it a good clean. I was considering using coca cola to try out an internet myth, but ACF-50 does as good a job, usually.
The hanger can now slide off. Its removal is not necessary, but it is no harm giving each of the pins a light coating of copper grease and clean the rest of the hanger.
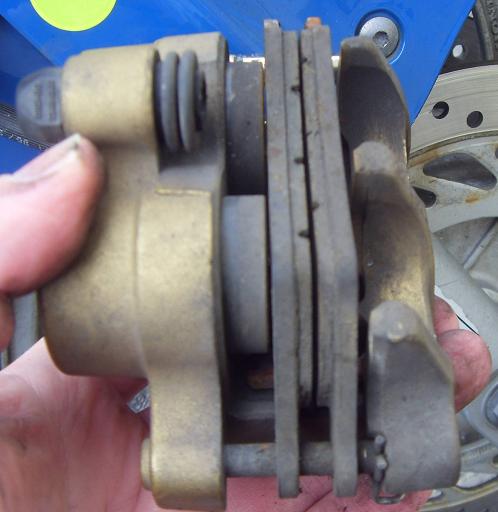
When refitting the new pads, insert the pin and R-clip FIRST with the pads in place. It is easier to locate them correctly in the caliper this way. Each pad sits either side of a cast notch on the caliper.
The R clip will not push "home" but will sit proud from the caliper. It is important to make sure the pin is fully inserted before fitting the clip. If forced, it will break. Replacement R-clips cost £3 or therabouts for something no bigger than a large staple.
As always, before refitting the calipers in place, push the pistons back until you have at least 10mm clearance.It should now slide easily back onto the disk, and bolt on, again to 22ft/lbs. Pump the brakes, and off you go.
After completing the task for either the Nissin or Brembo calipers
Operate the front brake lever to take up any slack in the mechanism before you take the bike out on the road, and check that there is free movement of the front wheel. Some slight catching or stiffness is fine as the wheel first rotates, as the pads will bed in quickly but be aware that for the first miles the front brakes won't be working at full efficiency.
Andy McCall comments : "One step you've forgotten that is common to all pad changes, careful application of copper grease to the backs of the pads and to the pad pins. I've had it drummed into me that this is about the best way to avoid brake squeal and issues at the next change.It only has to be a thin coating it assists with the shim. Just add a coda not to get any on the edges or faces of the pads. One way to control it is to put the pads together sandwich style, friction face to friction face, thin coat the backs of the pads and put them straight into the calliper holding the in place with the thumb of one hand whist pushing the retaining pin in place and screwing it in by a few threads to hold it in place. Put the calliper back into place and bolt up. To clean up the pad pin I used a Scotchbrite pad and GT85 (which has a small amount of PTFE in it) but any 'maintenance' spray will do."
Juan M Rico adds : "The problem is that petroleum greases degrade the rubber boots which protect the caliper pins. When that rubber fails, dirt and sand find their way inside the sliding pin chamber and then not even the best grease in the universe is going to stop that caliper from binding. The rubber boots are the key here. Short of the brake manufacturer's recommended grease, silicon based greases are the way to go. Silicon base oils have no effect on the rubber and if the grease is reinforced with PTFE or Moly disulfide - even better."
Jan-Herman van Wermeskerken
adds "You
may remember that I had some trouble with the replacement of the front
brakepads. Not anymore. I have found that changing the brake pads is very
easy. But I did not use your bungee solution. I did the following: remove
the old pads, take the caliper off, insert new pads and then prying them
open so they will fit the disc, remove the pads and then fit the caliper,
inserting one of the bolts and turning the bolt a few times. This means
that the caliper is still loose but the brake line is not under duress
and it is easy to fit the new pads. Inserting the second bolt and then
torqueing both bolts completes the job. Easy peasy. You could probably
do it by the wayside."
I welcome comments and feedback, please remove the extra 'z' from the email address.