Items required : new pair of disc pads, 5mm Allen key, rubber hammer, pliers, 27mm, 22mm, 14mm and 12mm sockets or ring spanners, extension and ratchet, wire brush.
All nut and bolt sizes are quoted as the spanner size required to fit them.
Time : expert 30 minutes, average 45 minutes, "first-time" one hour.
All the hands, tools, and bike in the photos are the author's. In some of the photos I have had to wipe my hands clean before using the camera. I am very receptive to comments and suggestions, but you use these pages entirely at your own risk.
Before undertaking this task I strongly recommend that you remove the rear wheel, as this very considerably improves general access and working space. You will have to remove the rear axle anyway and it's for this that you need the 27mm, 22mm and 12mm socket or ring spanners. An adjustable wrench is not suitable.
Removing the rear wheel gives you the chance to clean it up as it does tend to get rather dirty - and the crooks and nannies are hard to reach with the wheel in place. The photos on this helpsheet were all taken with the rear wheel removed.
Robert McNulty
very amusingly comments : "Tried doing this without removing the
drive hub..... wife not talking to me .....So much easier removing the
hub..... put new tyre on and then replaced the wheel and hub and a good
clean and inspection.... wife now talking to me... Thanks Rob."
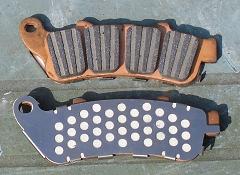
Here is the pair of new rear disc brake pads. Note the steel anti-chatter shim which backs each pad. Always change the pads as a pair, and be aware that dust from the old pads is distinctly unhealthy stuff. If in doubt, wear a face mask and eye protection when attacking the rear caliper area.
It is not necessary to remove or drain the hydraulic mechanism to change the pads.

I think that variants of the Deauville which have linked brakes tend to encourage greater use of the rear brake, with accelerated wear to the pads.
The new pads are approximately 9.2mm thick including the backing plate and anti-chatter shim.
Looking at the old ones, you should be able to see the distinct gap between the four pads. There is also a tell-tale maximum wear mark along the top surface of the pads.
It isn't necessary to remove the caliper bracket from the swinging arm if all you want to do is change the pads, but this is an ideal time to clean up the caliper and I'm working on the assumption that you'll be doing that as well.
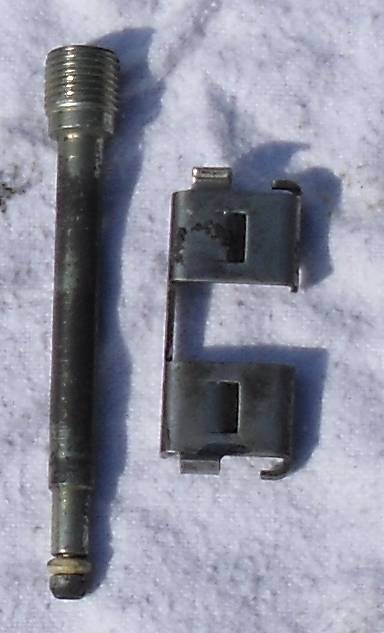
The pads are retained in the caliper body by a steel pin,deeply recessed and covered by a small rubber plug which keeps dirt out. Prise off the plug and insert your 5mm Allen (hex) key. You can see from the photo how deeply the pin is in the caliper.
 Unscrew
the pin and as it comes out, the pads will fall out one after the other
- they are only retained at one end. In this photo, one pad is just coming
away.
the Red Fox says : "If for any reason you have to stop work, don't let the caliper dangle on the end of its hydraulic hose. Use a bungee or strap to suspend it."
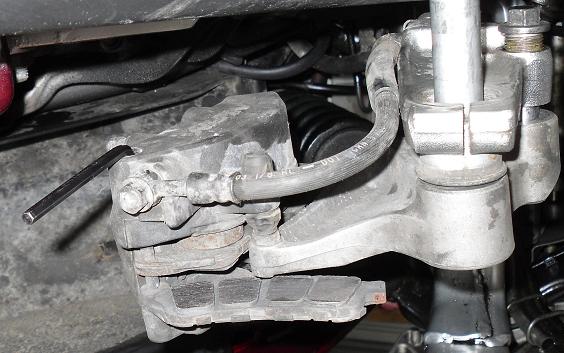
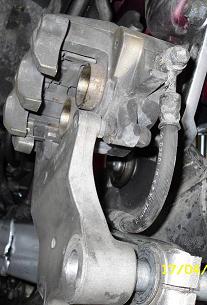
Once the rear wheel is removed, the caliper bracket and body are easily pulled free of the swinging arm. The 14mm head bolt and combined long pin which form the forward mount for the caliper bracket can be tough to remove; but persevere. Unscrew and knock it through from the wheel well area outwards, wirebrush it clean and grease it before refitting, so it comes out easily next time.
Be very careful not to apply any pressure to the rear brake footpedal once the wheel is out, as this will cause the pistons to be pumped outwards and even possibly completely ejected. This disaster would necessitate a complete brake system strip and rebuild.
Here is a general view of the caliper underside once the pads have both come out. Use your wire brush to remove any accumulated dirt and give the caliper body and its mounting arm a good clean-up.
Note that at the forward end of the caliper assembly is a small stainless steel protection plate. The front tongues of the pads locate in this plate and it protects the softer aluminium of the caliper body from being eroded as the pads move against the disc when the brake is applied.
This plate may fall out when the pads come away, or you may have to tickle it out with a screwdriver, but don't lose it.
Once the steel pin and stainless-steel plate are out, give them a good clean-up.
Tear a strip of soft cloth ino a 1" wide bandage shape and reach with it all around each of the gold-coloured pistons (seen in the above photo) and give the barrel-shaped pistons as good a clean and polish as you can. Avoid using any lubricating cleaning agent, which might leave deposits on the brake pads or disc surface.
Pay particular attention to cleaning all around the steel pins on which the caliper body slides to and fro as the brake is applied. If you must use a lubricant to ease their movement, be extremely sparse in applying it. You really don't want any unwanted chemical compromising the braking and if the new pads get contaminated, you'll have to replace them again.

The old pad (left) compared to a new pad (right). Quite a difference! The old ones had done 20,000 miles, there was still some life left in them, but I had the rear wheel out anyway to have new tyre fitted, so I thought it was a good chance to swap the pads.
If your old ones are more than 2/3 worn I recommend that you fit new ones.
When you replace the stainless-steel protection plate, this is how it fits into the caliper body. The plate is n-shaped and the "valley" of the "n" has to face downwards - through this "'valley" is where the disc rotates!
Don't do what I did the first time, which was to fit it upside down and then wonder why I couldn't get the caliper back into the correct location.
Doh! But it's an easy mistake to make - see the next photo!
Dan Quick says : "On Nissin (linked) rear calipers the rear anti-chatter shim is different to the front, and it's correct fitment is important, the thinner section of the shim, with a couple of small retaining lugs should be towards the fixed side of the brake caliper and the pad on that side be behind these clips and flush with the caliper face. It is easy to get caught out and wrongly fit this pad, which can lead to the brake binding."
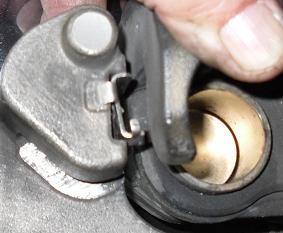
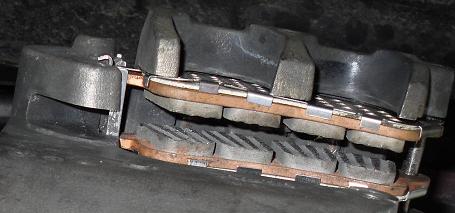
NOTE THAT IN THIS VIEW THE STAINLESS-STEEL PLATE IS UPSIDE DOWN!
Insert the new pads into the caliper body and push the pin through into its deep recess and through the eyes at the end of the pads, to secure them. The pads need a slight upwards pressure against the retaining springs in the roof of the caliper, so as to align their eyes with the pin as it's screwed home. Don't forget to push back the small rubber plug which blanks off the pin recess.
Well ... at least this picture shows you how NOT to do it ... and that we're all human and we all make mistakes. As a pal of mine once said, "the only people who don't make mistakes are people who don't do anything."
General view of the caliper underside after fitting the pads. It's a good idea to use a big screwdriver or other metal object to lever apart the pads and force the brake pistons inwards, as you'll need a 6 to 8mm gap between the pads to be able to slip the disc into the space between them when you replace the rear wheel.
After replacing the rear wheel, pump the rear brake pedal to take up any slack in the mechanism before you take the bike out on the road, and check that there is free movement of the rear wheel. Some slight catching or stiffness is fine as the wheel first rotates, as the pads will bed in quickly but be aware that for the first miles the rear brake won't be working at full efficiency.
I welcome comments and feedback, please remove the extra 'z' from the email address.
Andy McCall adds: "Another handy hint when refitting the rear wheel and brake caliper is to put everything back together by putting the caliper on the bottom of the disc and rotating it around the axle until the stopper bolt holes line up. One step you've forgotten that is common to all pad changes, careful application of copper grease to the backs of the pads and to the pad pins. I've had it drummed into me that this is about the best way to avoid brake squeal and issues at the next change. It only has to be a thin coating it assists with the shim. Just add a coda not to get any on the edges or faces of the pads. One way to control it is to put the pads together sandwich style, friction face to friction face, thin coat the backs of the pads and put them straight into the calliper holding the in place with the thumb of one hand whist pushing the retaining pin in place and screwing it in by a few threads to hold it in place. Put the calliper back into place and bolt up. To clean up the pad pin I used a Scotchbrite pad and GT85 (which has a small amount of PTFE in it) but any 'maintenance' spray will do."
John Stapleton adds : "You deserve many thanks for the servicing pages. Just fully serviced my NT650V2 using many of the pages. With regards to the Rear brakes, you are probably right to strip the entire thing for a good clean-up. I would offer an expedient alternative. Working from rear of bike, (looking down the exhaust pipe)
1) Remove the retaining
pad pin grommet.
2) Unscrew the pad pin using approx 6 to 8 inch extension with a 5mm hex.
This sticks the gap just above the exhaust.
3) Prise the old pads out, I found spinning the wheel brought them out.
4) May have been lucky, but I forced with my hand the calipers apart wide
enough to accept the new pads. (making sure the resevoir cap was off to
allow easy expansion)
5) Got new pads ready, copper grease on back of shims. Cleaned up pad
pin and coated with copper grease.
6) Slipped in new pads, pushed them home. Inserted pad pin, screwed it
up and put pad pin grommet back.
7) Pump rear brake. Approx 20 mins in total."